DesignWare(R) ARC(R) IoT Development Kit
Overview
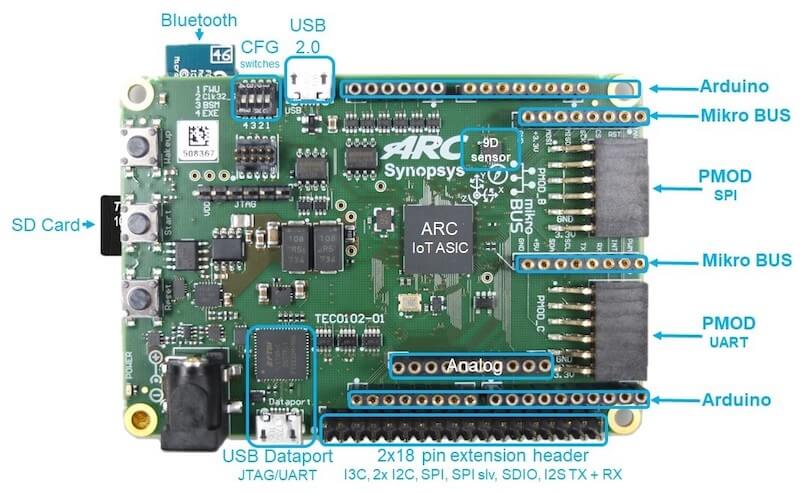
The DesignWare(R) ARC(R) IoT Development Kit is a versatile platform that includes the necessary hardware and software to accelerate software development and debugging of sensor fusion, voice recognition, and face detection designs. The ARC IoT Development Kit includes a silicon implementation of the ARC Data Fusion IP Subsystem running at 144 MHz on SMIC’s 55-nm ultra-low power process, and a rich set of peripherals commonly used in IoT designs such as USB, UART, SPI, I2C, PWM, SDIO, and ADCs.
For details about the board, see: ARC IoT Development Kit (IoTDK)
Hardware
For hardware feature details, refer to : ARC IoT Development Kit
Programming and Debugging
Required Hardware and Software
To use Zephyr RTOS applications on the IoT Development Kit board, a few additional pieces of hardware are required.
A micro USB cable provides power to the board; however, if the board is to run standalone, the universal switching power adaptor (110-240V AC to 5V DC), provided in the package, can be used to power the board.
Terminal emulator software for use with the USB-UART. Suggestion: Putty Website.
(optional) A collection of Pmods, Arduino modules, or Mikro modules. See Digilent Pmod Modules or develop your custom interfaces to attach to the Pmod connector.
Set up the ARC IoT Development Kit
To run Zephyr application on IoT Development Kit, you need to setup the board correctly.
Connect the digilent usb cable from your host to the board.
Connect the 5V DC power supply to your board (optional).
Set up Zephyr Software
Building Sample Applications
You can try many of the sample applications or tests, but let us discuss the one called Hello World. It is found in samples/hello_world.
Configuring
You may need to write a prj_arc.conf file if the sample doesn’t have one.
Next, you can use the menuconfig rule to configure the target. By specifying
iotdk as the board configuration, you can select the ARC IoT Development
Kit board support for Zephyr.
# From the root of the zephyr repository
west build -b iotdk samples/hello_world
west build -t menuconfig
Building
You can build an application in the usual way. Refer to Building an Application for more details. Here is an example for Hello World.
# From the root of the zephyr repository
west build -b iotdk samples/hello_world
Connecting Serial Output
In the default configuration, Zephyr’s IoT Development Kit images support serial output via the USB-UART on the board. To enable serial output:
Open a serial port emulator (i.e. on Linux minicom, putty, screen, etc)
Specify the tty driver name, for example, on Linux this may be
/dev/ttyUSB0Set the communication settings to:
Parameter |
Value |
|---|---|
Baud: |
115200 |
Data: |
8 bits |
Parity: |
None |
Stopbits: |
1 |
Debugging
Using the latest version of Zephyr SDK(>=0.9), you can debug and flash IoT Development Kit directly.
One option is to build and debug the application using the usual Zephyr build system commands.
west build -b iotdk <my app>
west debug
At this point you can do your normal debug session. Set breakpoints and then ‘c’ to continue into the program.
The other option is to launch a debug server, as follows.
west build -b iotdk <my app>
west debugserver
Then connect to the debug server at the IoT Development Kit from a second
console, from the build directory containing the output zephyr.elf.
$ cd <my app>
$ $ZEPHYR_SDK_INSTALL_DIR/arc-zephyr-elf/bin/arc-zephyr-elf-gdb zephyr.elf
(gdb) target remote localhost:3333
(gdb) load
(gdb) b main
(gdb) c
Flashing
If you just want to download the application to the IoT Development Kit’s CCM and run, you can do so in the usual way.
west build -b iotdk <my app>
west flash
This command still uses openocd and gdb to load the application elf file to IoT Development Kit, but it will load the application and immediately run. If power is removed, the application will be lost since it wasn’t written to flash.
Most of the time you will not be flashing your program but will instead debug it using openocd and gdb. The program can be download via the USB cable into the code and data memories.
When you are ready to deploy the program so that it boots up automatically on reset or power-up, you can follow the steps to place the program on SPI-FLASH or internal eFlash.
For instructions on how to write your program to FLASH, refer to the documentation on the IoT Development Kit at the embARC website.